

I love to create. And any project that is new and lets me be creative is my idea of fun.
Tuesday, 14 January 2014
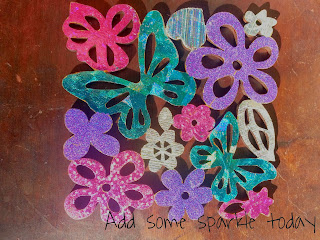
coral and gold nails
I have been dying to try foil art on my nails and I finally had the chance this week. It is so simple just paint your nails, in this case I painted them coral. When the nail polish has gone tacky lay your gold foil across at an angle or if you would like a french tip effect, lay it straight across the tip. Press down firmly making sure not to smudge the polish. Leave it to dry for about 5 minutes and then peel it off. One coat of clear varnish on top and it is done. They are so pretty I keep finding myself staring at the sparkle. Just like a starling. I just love me something shiny! Haha! Oh and please don't look at my hands. Bleh! They just don't do the foil art justice. Anyone willing to be my hand model?
 So now you have even more things to foil and you can take your sparkle everywhere with you. What do you think? Are you going to try it on your nails?
How do you like dem coasters?
I made these coasters a while back to demonstrate that foilart can be used on mdf. You would know that already if you have seen us at one of the markets. Wow! It is by far one of my most popular products! Everyone asks about it. So I thought I would show you how I made it, step-by-step.
You will need: Laser cut mdf coasters, super tack glue pen, Dark pink confetti foil, Purple glitter foil, Turquoise sparkle foil and silver pinstripe foil, high gloss varnish or Pratley glo.
So when you start with your coaster it will look like this. I recommend taking a pencil and writing on it gently which parts you want which colours. It helps you get the colours evenly balanced and helps you remember which parts you wanted which colour.
 Next, fill in with the glue all the parts you want dark pink. Make sure you get glue right up to the edges. Leave it to go clear and tacky. Place your dark pink foil over and press firmly. Make sure you 'catch the sides'. Keep repeating this step with each colour. In this picture you can see I had foiled everything but the silver.
 Last step, seal it. This is so important especially with a coaster. The foil is delicate and can get scratched easily. You don't want you work ruined when you have put so much effort into it.
 There you have it. Look at that gorgeous sparkle and shine. If you would like to order these coasters plain or ready-made please e-mail me for details.
You will need: Laser cut mdf coasters, super tack glue pen, Dark pink confetti foil, Purple glitter foil, Turquoise sparkle foil and silver pinstripe foil, high gloss varnish or Pratley glo.
So when you start with your coaster it will look like this. I recommend taking a pencil and writing on it gently which parts you want which colours. It helps you get the colours evenly balanced and helps you remember which parts you wanted which colour.


Simple yet Sparkly
I saw this here

and was inspired to make this.

It was super super easy and really so gorgeous.
You will need: Canvas, pencil, Super tack glue pen, Antique gold foil, dark pink confetti foil and high gloss varnish or modge podge.
Draw your words on. As you can see my sparkle is almost an exact replica of their sparkly and the rest I just wrote in cursive.
Next draw over all of the parts you would like to be gold, with the glue pen. Leave it to go clear and tacky. Then foil it. Make sure it is covered completely. Anywhere that is still sticky will catch the pink when you lay it over.
Repeat with the glue and the dark pink foil on the rest of the words.
Next step is to cover it with a coat of sealant to protect it. Mine is part of my market display so it will really be man handled so I needed it to be coated well so it doesn't get dirty or scuffed. I did 2 coats of high gloss varnish. Next time I think I will try something more matte so it still has that canvas look to it. Otherwise I'm very proud of my new wall hanging.
I hope you have a super sparkly day and remember to keep foiling.
Connect with me
Yes yes I know, I haven't posted in a while. Does anybody else feel like they are behind on the year already??? Crazy! So I'm catching up tonight and putting a few things on. When it rains it pours right? So I now have a page on facebook called foil art kzn-add some sparkle today. If you 'like' the page you will get more foil art inspiration via fb. I'm also on Instagram 'alliseearoundme' I like to put pictures of foil art things I have done that I didn't do step by step instructions for on there.If you have done some foiling you want to brag about. You can put it on Instagram with the label #addsomesparkletoday so I can see it too. Who knows maybe you can even become a guest blogger right here ;) And last but certainly not least my favourite place to waste time, learn new things and be inspired...Pintrest! Sigh whoever created Pintrest is my hero! I'm an addict!Search for me at Niki Lewis Higgs and you will find my Foil art board (and loads of other things I'm into) which has things you could tweak and make better with Foil art. As Foil art pioneers there isn't really much out there. Trust me I've looked! So we have to do it ourselves. Thus why the pins aren't how to foil but rather ideas of what you could foil. I read a quote the other day that goes 'good artists copy, great artists steal.' That is what we will do, take what we love and change it into something new and even better! So now you know how I spend my spare time. Feel free to chat to me I'm here to help anyway I can and now we can connect in so many ways too!
Saturday, 4 January 2014
What went wrong?
I've been getting a lot of questions from
people saying, their projects are not working what are they doing wrong? So
here is a list of the biggest mistakes people make, get this right and your
projects will be gorgeous.
First big mistake
Not thick enough: When the glue comes out
the pen it must be blue. If it is coming out and is clear it is too thin.

Leaving it to go tacky and clear: This one
shouldn't be hard. The pen is specially designed with a blue indicator. When it
is blue it's not glue. It must go completely clear. If you have loads of time
and enjoy watching paint dry. You would know it goes from blue, to dirty grey,
then clear. Only foil when it is clear. If you are an impatient kind of person,
like I am, it helps to do more than one project at a time. So while one dries
you can work on another project. Extra tip: Placing it in the sun or blowing
air from a hairdryer on it really speeds up the process.

Colour side up: When you place the foil on
the glue the colour side must be facing up.

Patchy edges: The foil is convex so
you need to press down the edges of your line. If you roll the soft side of
your fist over the foil. It 'catches the side.'

Why is it when you try to do something the wrong way it seems to come out best? Well that is what seemed to happen with shot. Sorry if it is not the best example. In this Picture the dot on the left wasn't evenly foiled. You can just make out the glue still showing on the bottom edge. Where as the right dot has a perfectly clear edge all around. Extra tip: If you peel your foil
away and you do find it is patchy because of not enough pressure. Just take
your foil and place it over the area and press again. This will touch-up any
patchiness.
Subscribe to:
Posts (Atom)